Saturday, January 31, 2015

Statistical Mechanics, Part 5

[This blog post is part of two series. The first series, titled Statistical Mechanics, is a series of lessons that I have developed to illustrate how curriculum and instruction can be designed to encourage vertical learning. We start by drilling down from our understanding of diffusion to develop a dynamic model of diffusion grounded in random particle motion using statistical mechanics. We then build on top of this foundation to construct deeper understandings of fluid flow, heat transfer, and electrical circuits. You can navigate through the lessons in this series using the links below. These lessons are then part of a larger series, Defining Vertical Learning.]

Part 1  |  Part 2  |  Part 3  |  Part 4  |  Part 5  |  Part 6  |  Part 7  |  Summary


Applying Statistical Mechanics to Model Dynamic Systems with Net Flow down Gradients


When a region of high concentration is next to a region of low concentration, there is a net flow of particles. This net flow does not occur because something is causing the particles to flow in a particular direction. The particles are still moving randomly, but more particles are moving from high to low concentration than from low to high concentration simply because there are more particles on the high concentration side.

There is a net flow of 8 pennies to the right
when half of the 38 pennies move to the right
and half of the 22 pennies move to the left.

The net flow between two regions is proportional to the difference in their concentrations. In our example, that difference is 16 pennies (38 − 22 = 16), which gives us a net flow of 8 pennies. If the concentration difference between two regions was 24 pennies (34 − 10), then the net flow would be 12 pennies.

There is a net flow of 12 pennies to the left
when half of the 10 pennies move to the right
and half of the 34 pennies move to the left.

A change in concentration over distance (across regions) is known as a concentration gradient. You can think of the gradient as a hill. There is a net flow of particles down the concentration gradient. The “steeper” the gradient, the greater the net flow.

Diffusion is not the only process generated by random particle motion creating a net flow down a gradient. An electrochemical cell inside of a battery contains an anode (negative terminal) and a cathode (positive terminal). The way a battery works is that a chemical reaction produces electrons at the anode and another chemical reaction removes electrons at the cathode. When a wire connects the anode to the cathode, electrons flow and an electric current is generated within an electrical circuit.

We are going to simulate this electrical circuit by making region 1 the anode and region 7 the cathode. There is a chemical reaction producing electrons at the anode that will keep the number of pennies in region 1 at 240. There is a chemical reaction removing electrons at the cathode, so any pennies that arrive at region 7 will be removed from the system. The 240-penny difference between the anode and the cathode is the potential difference across the circuit, and the net flow of pennies (electrons) through the system is the current. We will measure the current by counting the number of pennies removed at the cathode in each round.

A 7-region circuit with a 240-penny potential difference

By round 41, the system has reached a steady state where the number of pennies in each region does not change. If we actually count them, we can see that the number of pennies in each region drops by 40 going from left to right. At steady state, the 240-penny potential difference across the entire circuit is now divided evenly (240 ÷ 6 = 40) across the six control surfaces and seven regions. This results in a net flow of 20 pennies into each region from the left that is balanced by an equal net flow of 20 pennies out of each region to the right.

With a 40-penny difference between regions, the net
flow from region to region in each round is 20 pennies.

What happens if we reduce the potential difference across the circuit to 120 pennies or shorten the length of the circuit to five regions?
A 7-region circuit with a 120-penny potential difference

With a 20-penny difference between regions, the net
flow from region to region in each round is 10 pennies.

Reducing the potential difference across the entire circuit to 120 pennies reduces the potential difference between regions to 20 pennies (120 ÷ 6) at steady state. The potential gradient isn’t as steep and the current decreases to a net flow of 10 pennies per round.

A 5-region circuit with a 240-penny potential difference

With a 60-penny difference between regions, the net
flow from region to region in each round is 30 pennies.

Shortening the circuit to five regions means that the 240-penny potential difference will be divided evenly across four control surfaces at steady state. The potential gradient is steeper and the current increases to a net flow of 30 pennies per round.

If we wanted to, we could develop a formula to calculate the current through a circuit given the potential difference across the circuit and the length of the circuit:


Then, if we define the resistance in the circuit as 2L, we have Ohm’s law:


We shouldn’t be surprised that electric currents and diffusion share certain basic features and can be described by similar models. After all, when you drill down to their local mechanisms, both processes are generated by random particle motion creating a net flow down a gradient. By building both processes on top of the same foundation, we strengthen that foundation and encourage learning to go vertical. A little bit later in this lesson, we will be extending our model to simulate two additional processes, fluid flow down a pressure gradient and heat transfer down a temperature gradient.


Part 1  |  Part 2  |  Part 3  |  Part 4  |  Part 5  |  Part 6  |  Part 7  |  Summary

Thursday, January 29, 2015

Statistical Mechanics, Part 4

[This blog post is part of two series. The first series, titled Statistical Mechanics, is a series of lessons that I have developed to illustrate how curriculum and instruction can be designed to encourage vertical learning. We start by drilling down from our understanding of diffusion to develop a dynamic model of diffusion grounded in random particle motion using statistical mechanics. We then build on top of this foundation to construct deeper understandings of fluid flow, heat transfer, and electrical circuits. You can navigate through the lessons in this series using the links below. These lessons are then part of a larger series, Defining Vertical Learning.]

Part 1  |  Part 2  |  Part 3  |  Part 4  |  Part 5  |  Part 6  |  Part 7  |  Summary


Applying Statistical Mechanics to Model Dynamic Systems


If all we know is that diffusion is the flow of particles from regions of high concentration to regions of low concentration, then we can predict the state of a pipe with red dye in it after it has reached equilibrium, but not much else. We have no sense of how long it takes for a system to reach equilibrium or what it looks like before that happens. But if we model diffusion with randomly moving pennies, we can observe diffusion as a dynamic process that occurs over time.

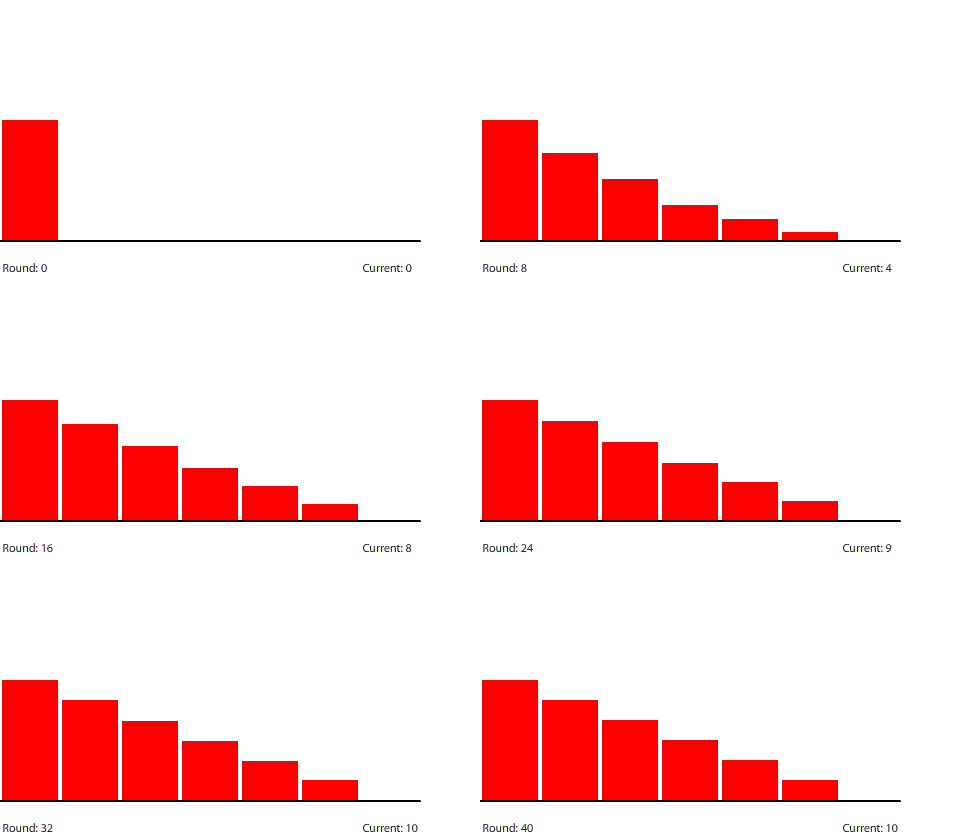
Diffusion in a 4-region pipe

Diffusion in a 6-region pipe

Diffusion in a 8-region pipe

For example, we can see that the rate of diffusion decelerates over time and that the time it takes to reach equilibrium grows longer as the pipe grows longer. I was curious about the relationship between pipe length and time to reach equilibrium, so I collected some data:

Rounds to reach equilibrium (±10%)

When I was conducting this investigation, I realized that I couldn’t count the number of rounds it took for the system to reach equilibrium. Because the rate of diffusion decelerates as the system approaches equilibrium, it’s hard to say when the system has actually gotten there. Instead, I counted the number of rounds it took for every region in the system to be within ±10% of the concentration the system will have when it does reach equilibrium.

One of the fun things to do when simulating a system is to try to create the same system in real-life to test and calibrate the model. It would be interesting to see if the concentration profile we see when we simulate diffusion in a pipe matches what we see in reality. I have been wondering if it is possible to use a camera to record dye diffusing in a clear pipe, and then to estimate concentration over time using color. Then, if the model is a reasonable approximation, you can try to figure out how long a round is in seconds or how wide a region is in centimeters.

It is important to demonstrate that the model reflects reality, otherwise the insights we gain from designing and running simulations won’t transfer to the physical world and we won’t be grounding our understanding at all. Our simulations don’t have to be completely accurate, but they do have to be accurate enough so that we can start to learn and explain why certain phenomena happen.

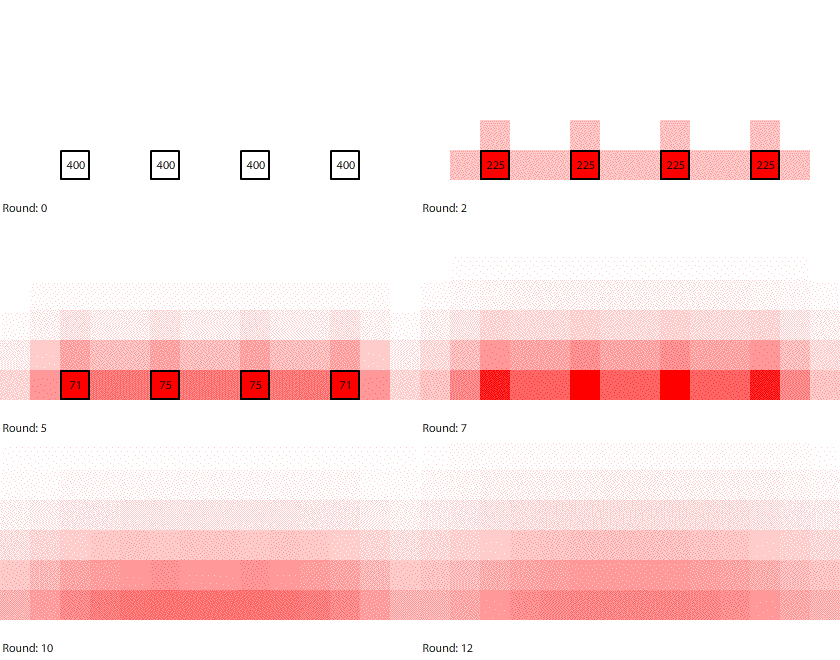
A block of 400 pennies dissolving

For example, here is a simulation of a block of solid red dye dissolving in water. The block of red dye is made up of 400 pennies in the solid state. When this block of red dye hits the water in region 1, it begins to dissolve as pennies leave the solid state and enter the water. The solid red dye continues to dissolve until there are 200 pennies in region 1. At that point, region 1 is “saturated.” If the number of pennies in region 1 dips below 200, then more pennies will dissolve to make up the difference until the block of solid red dye is completely gone. In this simulation, the block of red dye disappears after 4 rounds.

A block of 800 pennies dissolving

What happens if the block of solid red dye is made up of 800 pennies? It takes 21 rounds for the block to disappear, which is over five times longer. It takes 1 round for the first 200 pennies to dissolve, 3 rounds for the next 200, 7 rounds for the third 200, and then 10 rounds for the last 200. Why does it take longer for the dye to dissolve later? What would happen if the block of solid red dye was made up of 1600 pennies? It may not actually take five times as long for twice as much red dye to dissolve if we conduct this experiment in the real world, but it does take longer and we can figure out why by studying the simulation. In fact, we can learn a lot just be designing the simulation and trying to make it more accurate.

A 4-region block dissolving in two dimensions

Our simulation was only in one dimension, and the block did not get smaller as it dissolved. Here is a 4-region block dissolving in two dimensions. This time, a region is saturated when it has 100 pennies. The top two regions dissolve after 11 rounds, and the whole block is gone after 21 rounds. Why do the top two regions dissolve faster?

Four 1-region blocks dissolving in two dimensions

If we simulate four 1-region blocks dissolving in two dimensions, the blocks dissolve only after 7 rounds. Why do four individual blocks dissolve faster than four blocks stacked together? And even though all four blocks disappear after 7 rounds, the two outer blocks do dissolve slightly faster than the two inner blocks.

By modeling the system with randomly moving pennies and observing what happens over time, we gain a deeper understanding of the system than if we simply know what the system looks like when it has finally reached equilibrium.


Part 1  |  Part 2  |  Part 3  |  Part 4  |  Part 5  |  Part 6  |  Part 7  |  Summary

Tuesday, January 27, 2015

Statistical Mechanics, Part 3

[This blog post is part of two series. The first series, titled Statistical Mechanics, is a series of lessons that I have developed to illustrate how curriculum and instruction can be designed to encourage vertical learning. We start by drilling down from our understanding of diffusion to develop a dynamic model of diffusion grounded in random particle motion using statistical mechanics. We then build on top of this foundation to construct deeper understandings of fluid flow, heat transfer, and electrical circuits. You can navigate through the lessons in this series using the links below. These lessons are then part of a larger series, Defining Vertical Learning.]

Part 1  |  Part 2  |  Part 3  |  Part 4  |  Part 5  |  Part 6  |  Part 7  |  Summary


Applying Statistical Mechanics to Model Diffusion


So far, we have developed a model for diffusion using pennies. To move the pennies randomly, we flip them. If they come up tails, they move to the left. If they come up heads, they move to the right. When simulating a system where all of the pennies are concentrated to the left, we have seen that random motion does cause the pennies to move from regions of higher concentration to regions of lower concentration without any coordination or sense of the big picture. But how?

Pennies moving randomly left and right, region to region, over time

When running this simulation, everyone is assigned to count, flip, sort, and move pennies in a region. Our view is restricted to that one region. To figure out how the pennies “know” to move from regions of higher concentration to regions of lower concentration, we are going to change our perspective. Instead of observing a single region, we are going to observe the boundary between two regions. This boundary is known as a control surface.

Imagine that you are watching the boundary between a region with six pennies and a region with ten pennies. What’s going to happen? Well, you don’t know because you don’t know which pennies will come up tails and which pennies will come up heads when we flip them. But what would you expect to happen on average if you ran this simulation a hundred times?

A net flow of two pennies from region 5 to region 4

On average, you would expect half of the pennies (three) in region 4 to come up heads and move to the right, and half of the pennies (five) in region 5 to come up tails and move to the left. On average, there would be a net flow of two pennies from region 5 to region 4.

A net flow of four pennies from region 4 to region 5

Now imagine that region 4 has ten pennies and region 5 has two pennies. In that case, there would be an average net flow of four pennies from region 4 to region 5.

A net flow of zero pennies between region 4 and region 5

If region 4 and region 5 both have six pennies, pennies still move randomly across the control surface, but the average net flow is zero pennies.

In our model, pennies aren’t moving from regions of higher concentration to regions of lower concentration; they are moving randomly. But when a region with more pennies is next to a region with fewer pennies, there will be, on average, a net flow of pennies from the region with more pennies to the region with fewer pennies. Why? Simply because there are more pennies on that side of the boundary.


In fact, the average net flow between two regions is proportional to the difference of the number of pennies in those regions. And, if we wanted to, we could come up with a formula for it. Don’t worry about this formula for now. We will come back to it later.

When we start using probabilities to predict the state of the simulation in the next round, we are applying statistical mechanics. I believe that it is important to run a few simulations where you are still physically flipping the pennies because it makes the experience more concrete, and you can see that pennies are constantly moving in both directions and that nothing is controlling them. That is less obvious when you add a layer of abstraction with statistical mechanics or by running the simulation on a screen. But running a simulation with pennies is time-consuming, and it is a lot faster to predict that, on average, ten pennies will come up as five tails and five heads than to actually flip, sort, and count them. It also means that you can run simulations individually or in small groups instead of having to do it as a whole-class activity.

Pennies diffusing in a pipe with six regions

Here is a simulation with 200 pennies and six regions. I am using statistical mechanics, so I am saying that half the pennies will come up tails and move to the left and half the pennies will come up heads and move to the right.


You can calculate the number of pennies in each region for each round manually, or you can set up a spreadsheet and use formulas to perform the calculations automatically. It took about five minutes to set up this simulation in a spreadsheet. In the first row, I typed in the initial conditions. In the second row, I set up the formulas to calculate the number of pennies in each region in round 1 using the data in round 0. Then, using the “fill down” or “auto-fill” feature of the spreadsheet, I added more rounds. You can look at my spreadsheet here.

By modeling diffusion with randomly moving pennies, we have grounded our understanding of diffusion in our understanding of the particle theory of matter, that matter is made up of particles in perpetual motion. We have established, on a visceral level, that simple local mechanisms can generate complex macroscopic phenomena. We have made our understanding of diffusion more functional by introducing the idea that the rate of diffusion is proportional to the concentration gradient. And we have developed a tool that we can use to investigate self-generated “what-if” questions. For example, what happens if the pipe we are simulating is a different length?

Pennies diffusing in a pipe with four regions

Pennies diffusing in a pipe with eight regions

The ability to observe diffusion at a molecular scale and to conduct your own investigations stimulates curiosity and encourages inquiry.


Part 1  |  Part 2  |  Part 3  |  Part 4  |  Part 5  |  Part 6  |  Part 7  |  Summary
Monday, January 26, 2015

Statistical Mechanics, Part 2

[This blog post is part of two series. The first series, titled Statistical Mechanics, is a series of lessons that I have developed to illustrate how curriculum and instruction can be designed to encourage vertical learning. We start by drilling down from our understanding of diffusion to develop a dynamic model of diffusion grounded in random particle motion using statistical mechanics. We then build on top of this foundation to construct deeper understandings of fluid flow, heat transfer, and electrical circuits. You can navigate through the lessons in this series using the links below. These lessons are then part of a larger series, Defining Vertical Learning.]

Part 1  |  Part 2  |  Part 3  |  Part 4  |  Part 5  |  Part 6  |  Part 7  |  Summary


Modeling Diffusion


For most of us, diffusion makes sense because we have lots of firsthand experience with it. We see diffusion happening in our everyday lives. It seems natural and intuitive. But few of us understand the local mechanisms that drive diffusion. We know that particles flow from regions of high concentration to regions of low concentration, but we don’t know how or why. Some of us even have an inaccurate and misleading view of diffusion on a molecular scale, even though we know that the particles of red dye are moving randomly and not being guided in any specific direction.

An inaccurate and misleading visualization
of diffusion on a molecular scale

In this lesson, we are going to drill down and model diffusion using random particle motion. Pennies will represent red dye particles, and to keep things simple for now, pennies will only move along one dimension, to the left or to the right. To determine the direction a penny moves, we will flip it. If the penny comes up tails, it moves to the left. If it comes up heads, it moves to the right. It doesn’t get any more random than that!

Place your pennies in a cup. Shake them up and then dump
them out. The pennies that come up tails are passed to the
left. The pennies that come up heads are passed to the right.

Next, we are going to set up a number of discrete regions in a row. Pennies will move either left or right, from region to region.

At the start of the round, there are six pennies in region 3,
four pennies in region 4, and three pennies in region 5.

Shake up the pennies in each
region in a cup and dump them out.

Pass the tails to the left and the heads to the right.

At the start of the next round, there are five pennies
in region 4, three from region 3 and two from region 5.

Any pennies in the leftmost region that come up tails will stay where they are, and any pennies in the rightmost region that come up heads will stay where they are. These are our boundary conditions. At the start of the simulation, all of the pennies will be in the leftmost region. This is our initial condition.

In this simulation, I am using 200 pennies. The more pennies you use, the smoother the results. But you also want to make sure that the number of pennies you use doesn’t take too much effort to flip, sort, and pass. When I did this in a classroom of 32 students, I set up the simulation so that there were eight regions in a row, with one student per region. This gave us four rows. Then, instead of treating each row as a separate simulation, we combined the data so that all of the pennies were in a single simulation.

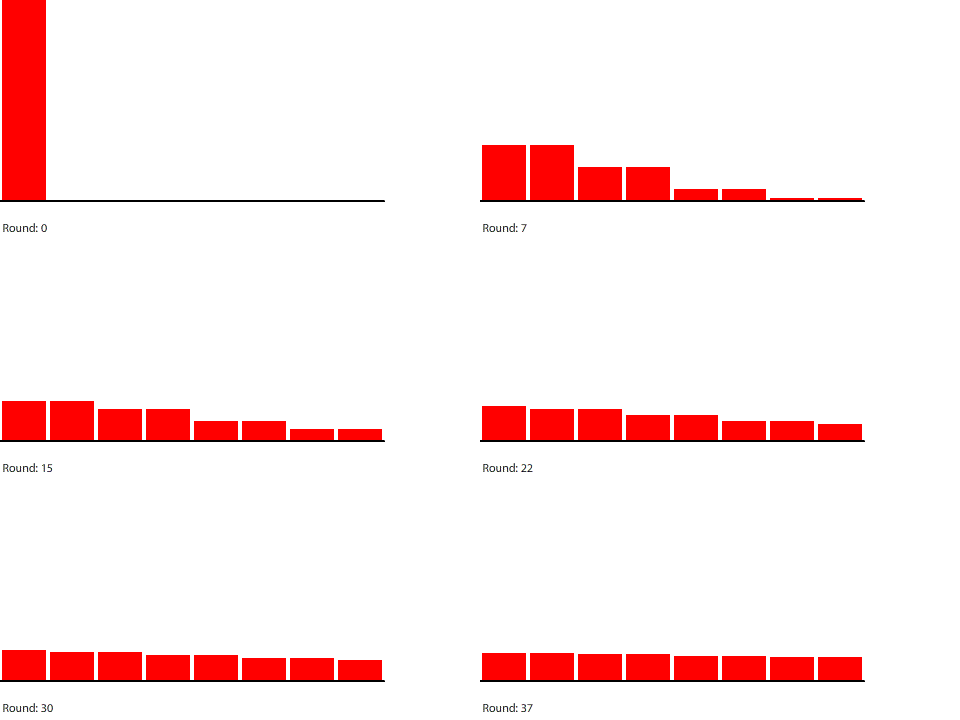
Pennies moving randomly left and right, region to region, over time

The red bars in the graph above represent the number of pennies in each region. As you can see, the pennies are initially concentrated in the leftmost region, but as they move randomly left and right, they are slowly becoming evenly distributed.

Here is another way to visualize the same data that was inspired by a molecular
diffusion animation created by a commenter, Steve. The model simulates diffusion
in one dimension, which you can think of as a sealed pipe with red dye in one end.

If you run this simulation with pennies, the participants are actually fairly shocked at the end. During the simulation, you are simply receiving pennies, shaking them up and dumping them out on a table, and then passing them on. After each round, you count the number of pennies in your region and report the results. You may, from time to time, glance at the regions next to you, but you generally have no idea what is happening across the entire simulation. All you see are your pennies, which are moving randomly with no direction or sense of their surroundings. You may know that the pennies are suppose to end up evenly distributed, but you can’t see how your actions contributed to that happening. It’s a bit like a thousand people each painting the roof of their house a random color, and then flying overhead and seeing that, when taking all the roofs together, you’ve collectively painted the Mona Lisa without meaning to. Okay, that would be way cooler, but you get the idea!

On an intellectual level, we know that simple local mechanisms on the molecular scale generate the complex macroscopic behaviors that we see everyday. They have to, since particles don’t have brains and there’s no one coordinating them. But most of us don’t know that on a visceral level. For most of us, this simulation serves as an introduction to a brave new world. Have we figured out how the random motion of pennies caused those pennies to diffuse? Not yet. But we saw it happen right in front of us, and we will.


Part 1  |  Part 2  |  Part 3  |  Part 4  |  Part 5  |  Part 6  |  Part 7  |  Summary

Thursday, January 22, 2015

Statistical Mechanics, Part 1

[This blog post is part of two series. The first series, titled Statistical Mechanics, is a series of lessons that I have developed to illustrate how curriculum and instruction can be designed to encourage vertical learning. We start by drilling down from our understanding of diffusion to develop a dynamic model of diffusion grounded in random particle motion using statistical mechanics. We then build on top of this foundation to construct deeper understandings of fluid flow, heat transfer, and electrical circuits. You can navigate through the lessons in this series using the links below. These lessons are then part of a larger series, Defining Vertical Learning.]

Part 1  |  Part 2  |  Part 3  |  Part 4  |  Part 5  |  Part 6  |  Part 7  |  Summary


Diffusion


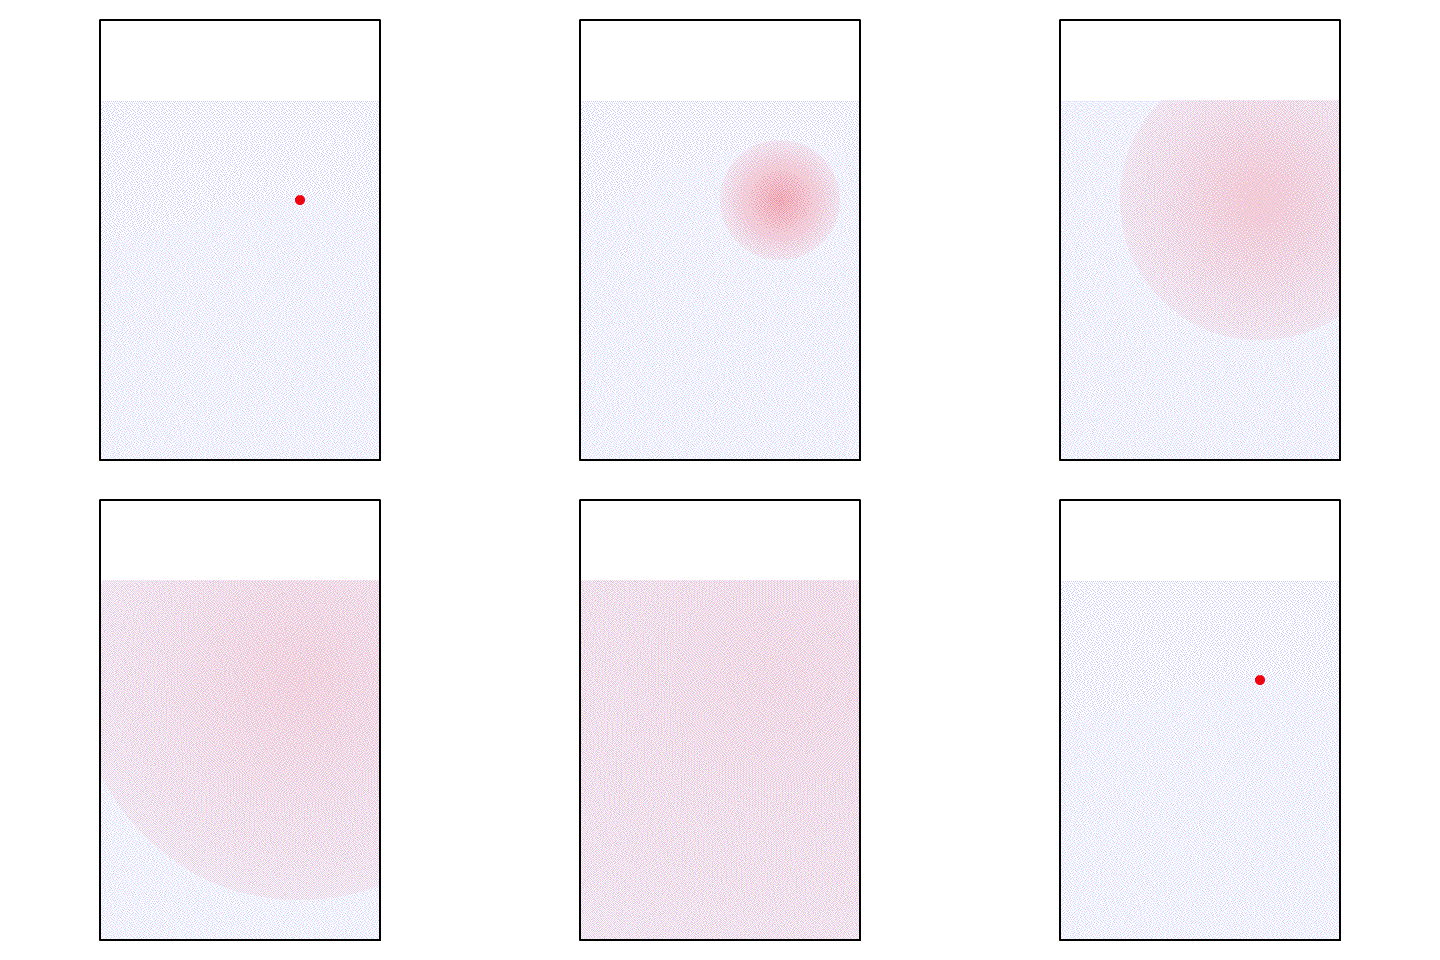
If I take a drop of red food coloring and put it in a glass of water, what happens? The red food coloring begins spreading out until, eventually, the entire glass of water is a light pink color.

A drop of red food coloring in a glass of water

This process is known as diffusion. Diffusion is the flow of particles from regions of high concentration to regions of low concentration. What does this look like on a molecular scale?

An inaccurate and misleading visualization
of diffusion on a molecular scale

If the red dots represent particles of red dye, then we might think that diffusion looks something like this on a molecular scale. The red dye particles are moving away from each other, spreading out until they are evenly distributed. But how do the red dye particles know where to move? Can they detect regions of high concentration and low concentration? Even if particles could detect concentrations across distances, why would they want to move to a region where it is less crowded? Do particles have goals and desires?

For most of us, diffusion makes sense because we have lots of firsthand experience with it. We see diffusion happening in our everyday lives. It seems natural and intuitive. But few of us understand the local mechanisms that drive diffusion. We haven’t tried to drill down and ground our understanding in anything beyond the textbook definition of diffusion. This can result in misconceptions, such as the inaccurate and misleading visualization of diffusion on a molecular scale pictured above. Red dye particles don’t move away from each other; they move randomly. So how does diffusion happen? To figure that out, we will start with what we know.


Part 1  |  Part 2  |  Part 3  |  Part 4  |  Part 5  |  Part 6  |  Part 7  |  Summary

Friday, January 16, 2015

Coaching and the Tao of Arch Building

[This blog post is part of a series, Defining Vertical Learning.]

In 1994, I was getting a master’s degree in education at Boston University to become a teacher. For an assignment, a group of us had to write a formal lesson plan and then teach that lesson to the rest of our classmates. This is the first formal lesson I can remember writing.

The lesson we developed was based on an idea that I had while taking Physical Chemistry in my junior year at Carnegie Mellon. It is an idea that inspired me to become a teacher and inspired my thinking about vertical learning. I have held this lesson in my back pocket for the past twenty years, knowing that I would whip it out if I ever had to show someone what vertical learning looks like.

I’ve demoed this lesson a few times in workshops that I’ve run for teachers, and I talked about it in an long-ago blog post I wrote when I first coined the term vertical learning. But I’ve never developed the lesson further or published it in any form. The standard reasons for why I might have sat on the lesson instead of working on it and promoting it are fear of failure or fear of success. Because I am a vertical learner who drills down into things all the time, I generally know when I am avoiding something out of fear. It’s that damn hyper-sense of integrity I’ve developed. This wasn’t fear.

As a vertical learner, I am also constantly striving for alignment. When I am building an idea, I am usually juggling a bunch of moving parts and trying to fit them together into a cohesive framework. I wrote about the challenges of bringing multiple parts into alignment in my post, Circular Logic. If defining vertical learning is like building an arch, then this lesson represents a single stone in that arch. On its own, it’s a very nice stone, but it won’t generate the kinds of outcomes that I’m hoping to see. If I can’t define vertical learning, if I can’t help people visualize the big picture, if I don’t even have the vocabulary to help someone think about what a student is experiencing as they go through this lesson… then all anyone will see is a nice stone.

“Nice stone, dude.”

Arch building is daunting because, even when you’ve carved almost all of the stones and fitted them together, until the last stone is in place, the entire structure falls apart. If someone walks by at this point, all they’ll see is a pile of stones on the ground. They won’t see an arch; they won’t get what you are building.

“Nice pile of stones, dude.”

The more you think vertically, the more parts you want to bring into alignment. The more parts you want to bring into alignment, the more difficult and longer the arch-building process. But we strive to build arches because the results are so satisfying and the outcomes so powerful.

“Whoa! That’s an arch. It all hangs together, dude!”

I had held off on defining vertical learning and publishing this lesson because the task was so daunting. It was going to take me years of effort to complete, and until it was completed, no one would get it. They would see me working day after day, chiseling stones and fitting them together, with no understanding of what the final structure would look like. And I knew myself well enough to know that, without support and encouragement along the way, I might quit before finishing. Then where would I be?

Two years ago, I began working with my coach, Sarah. My primary reason for hiring a coach was to hone my communication skills. I wanted to get better at pitching my ideas. Not ideas as complex as vertical learning. Two- or three-stone ideas, not twenty-stone ideas. You might think that the role of a coach is to tell you to suck it up. You want to define vertical learning? Then get off your lazy ass! A journey of a thousand miles begins with a single step.

But, no. Sarah’s approach to coaching is integrity and alignment. Know yourself. Know the who you want to create. Be true to that. There are times when my place gets a little messy. When the clutter starts building up, cleaning starts to feel daunting, and then I stop cleaning all together. I allow my place to fall into a terrible state until, with a Herculean effort, I finally suck it up and do a massive spring cleaning. But while my place is a mess, I lose that sense of peace, positive energy, and well-being that I talked about in my last post, and I feel the energy getting sucked right out of me.

The answer wasn’t just to suck it up or to break my cleaning down into smaller, more manageable chores that would feel less daunting. The answer was to drill down and figure out what works for me. If I didn’t let clutter build up, then I wouldn’t stop cleaning. Clutter starts to build up because I hate going to the dumpster. I force myself to go to the dumpster only when the kitchen garbage bag is overflowing, but then I don’t have the room or hands to carry the empty pizza box or the cardboard box filled with packing peanuts from Amazon with me. The solution was to introduce an evening stroll before bed to my routine. I don’t do it in the winter, but in the summer, it is awesome. I stroll at around 3 a.m., and it is dead quiet outside. I love the feel of the warm air as I walk around in my shorts, t-shirt, and sandals. I’ll carry one or two items to the dumpster, pick up my mail, bring in an item from the car (my car starts to get cluttered as my place gets cluttered), and decompress from the day. The stroll is joyous for me… something that I would want to keep doing even if I wasn’t de-cluttering. Putting that system in to place means that my place never gets too messy. I still do spring cleaning sometimes, but the task is no longer Herculean and I can actually enjoy it.

Another system that Sarah introduced was the practice of writing things down. I’m a writer at heart, but I keep a lot of things locked up in my head. Keeping so many things in my head creates cognitive load that prevents me from being in the moment and thinking at my best. When building an arch, not only did I feel like I had to create the arch in one go, I had to do it while holding up all of the individual stones at the same time. Writing things down enabled me to put stones down without worrying that I’d lose one. Then I could pick up the one or two stones that I was working on, and give them my full attention. Because I could pick up stones and set them aside whenever I wanted, I could work on my arch while I was in the shower or washing dishes. My brain was freed up because I wasn’t trying to store everything in memory, and when ideas were on paper, I found it easier to play with them.

I have tried to maintain a journal in the past, but I could never stick with it. I maintain a gratitude journal now, but that is a different kind of writing. When writing about vertical learning, I need to feel as though I’m writing to a potential audience, but in a format that reinforces that my thoughts are strictly works in progress. I think I have found the right system for me in this blog. Sarah suggested that I try blogging, but that isn’t really her main contribution as a coach. She helped me identify that I need to write things down, and then she encouraged me to find a system that aligned with who I am and how I write. If blogging hadn’t worked out, then I would have tried something else.

I am ready to write about my lesson now. I’m not sucking it up. I’m not using my drive to define vertical learning to overcome my fears. I have brought a number of systems online that have enabled me to work on individual stones in my spare time. These systems are aligned with who I am. As I’ve striven for alignment, I’ve looked for opportunities to define vertical learning through other projects that I’m working on. I can re-purpose some of those stones from those arches when I go to build my vertical learning arch. Two weeks ago, when I wrote Defining Vertical Learning, I recognized that I was finally ready. I had done enough pre-work (bringing myself into alignment and getting individual stones ready) that the idea of assembling the arch was no longer daunting. It was within striking distance. I hadn’t changed myself; I had taken steps to put myself in this position by understanding who I am and aligning everything around me.

When thinking about vertical learning, I have always said that drilling down and building up encourages you to develop skills and habits of mind that enable you to drill down further and build up higher. But Sarah gave me another way to look at it. If you can go and bring A-B-C into alignment, and then D-E-F and G-H-I into alignment, you are naturally going to start thinking about bringing A-B-C-D-E-F-G-H-I-J-K-L into alignment. I never thought that I’d be nearing the end of a twenty-five year odyssey because I started taking an evening stroll and writing random thoughts in a blog… but here I am.

Thursday, January 15, 2015

On Alignment and Candle Holders

[This blog post is part of a series, Defining Vertical Learning.]

In 2005, I was shopping for candle holders. I had just moved to Acton for a job and I was furnishing my apartment. I come from a large family, with two brothers and two sisters, three of whom are older than I am, and I’ve always furnished my places with hand-me-downs. Oh, you need some pots? I have a set in my basement. What’s that? I’ve got an old sofa that you can have. I’ve had my eye on a new one for myself. Financially it was great, but none of my stuff matched and I had never developed my own aesthetic.

When I moved to Acton, at 35 years-old, I was determined to become my own man. For months, I made weekly trips to Bed Bath & Beyond and Linens ’n Things, bringing furniture home and then returning what I didn’t like. I honestly didn’t know my own tastes and I had to discover myself along the way. The final items I shopped for were candle holders. I hadn’t quite come to grips with the idea of home furnishings as decorations, so I told myself that candles were functional in the case of a blackout!

I literally looked at hundreds of candle holders. I browsed the internet for them. When out and about, I ducked into random stores to see what they had in stock. Nothing felt quite right until I found the perfect candle holders at Target. More platform than holder, they were made by setting a 3.75” black stone disk into a matte black iron rim with three small ball bearings for feet. They were very minimalistic and the materials gave them a natural feel… like candles resting on top of a stone in the wild. I liked how the green, pear-scented candles that I chose (3” tall and 2” in diameter) sat on them totally free and unencumbered. Then, every time I came home to my fully-furnished apartment, I felt this incredible sense of peace, positive energy, and well-being wash over me. I was home. This was me.


It seems like such a minor thing, but drilling down to discover myself and then bringing my surroundings into alignment with that… it was huge. I had never felt so restful or happy in a place. I started online dating at around the same time, and when I recounted my adventures furniture shopping, it was like I was the best and most vibrant version of myself. Being true to one’s self is never a small thing. In many ways, it’s the only thing.

Wednesday, January 14, 2015

Learning to Program iOS Apps

[This blog post is part of a series, Defining Vertical Learning.]

Last year, I decided to learn how to program iOS apps. I had tried to learn this before, but had always given up at the first hurdle. Most books on programming iOS apps start off using table views. I guess, on iOS, creating a scrollable list in a table view is a bit like printing “Hello, World” on the screen. Given the screen size of an iPhone, it makes sense that most apps will be built around scrollable lists. But the gulf between the apps that I wanted to create and the apps that these programming books wanted me to create was so huge that I felt defeated right away.

Other than an introductory computer science course in college, I had no formal training in programming and was entirely self-taught. Learning to program iOS apps involved learning the Cocoa Touch framework, Objective-C, and Xcode. I had zero experience with C, and I had never worked with a set of APIs or an IDE that was nearly as rich and complex as Cocoa Touch and Xcode. The number of things that I’d have to learn was daunting, and I did not want to feel as though it would take months before I could even begin to program the kind of apps I wanted to create.

Fortunately, Apple introduced Sprite Kit in iOS 7. Sprite Kit is an API for creating 2D games. It makes it very simple to draw to the screen and animate things. Since most of my current projects run within a <canvas> element on a web page using JavaScript, this was right up my alley.

I have learned a number of programming languages in the past, so I basically know what works for me. I found a book of Sprite Kit tutorials for beginners and worked through a third of them. At this point, I was copying lines of code verbatim and then running them to see what would happen. For each tutorial, the book included a challenge at the end where you had to tweak the program to get a different outcome. I completed those as well, but I was a long way from understanding the code that I was writing.

After completing about a third of the tutorials in the book, I felt like I had drilled down far enough to where I understood some of the basic concepts and was familiar enough with Cocoa Touch and Xcode to attempt to write one of my own programs. Because I still did not fully understand the code that I was writing, when I wanted to do something that I didn’t know how to do, I would scour through the tutorials to find a piece of code that did the same thing or something similar. Once I had found the code that I wanted, I would copy it verbatim into my own program. This worked well as long as I stuck to fairly standard tasks.

When learning a new programming language, one of the benchmark standards I have for myself is being able to read through a program and understand what it is doing. This doesn’t mean that I understand every word or could write the code myself, but I know enough to follow the program logic fluently. I decided that it was time to create my first full-fledged app, something that could be released on the App Store. I decided to port a game that I had created a long time ago in BASIC, but to add native iOS features, including Game Center support, data syncing, and a full user interface built in Interface Builder. Most of my previous projects had been a single view in a single window running a Sprite Kit scene. I also wanted this app to be a universal app that would run on 3.5" iPhones, 4" iPhones, and iPads.

To create this app, I couldn’t rely on code snippets from tutorials any more. I started using Apple’s own API documentation as a reference, and searching for tips on Stack Overflow (a website where programmers ask and answer questions). Now that I could fluently read and get the gist of a chunk of code, I pushed myself to reach my next benchmark standard: fully understanding every line of code that I was writing. There had always been certain terms or concepts that I had used but didn’t understand; now I wanted to understand them.

After releasing my first native iOS app to the App Store, it was almost time for me to graduate from exercises to creating real apps for work. For my final exam, I decided to port a far more complex app and to build it using Core Data. To make it even more challenging, I decided to include functionality that was discouraged both by Apple and by the resident Core Data experts on Stack Overflow. In Core Data, when an iCloudstore is initialized on a device, a fallback store is created first and then the actual iCloudstore is created and synced with iCloud. If you search Stack Overflow, there are a few hacks that attempt to detect when the fallback store is created and then switched over with the actual iCloudstore, but the expert advice on Stack Overflow is: DON’T TRY IT. I wanted to try it.

I came up with an approach for sniffing out the iCloudstore initialization process that is more robust than anything I’ve seen, but it is also very complex. I made things even more complicated by allowing the user to navigate through and use the app while the iCloudstore is initializing, which means that the app has to able to react to the initialization process no matter where the user is or what the user is doing. To accomplish this, dozens of objects have to communicate and interact intricately. Timing and sequence is critical.

In Objective-C, there are a few ways for objects to communicate with one another. For example, Object A can send a message directly to Object B, but in order for that to work, Object A has to know how Object B works, and it has to hold a reference to Object B. If you change Object B, you may have to update Object A as well or your program may not work as expected. Alternatively, Object A can broadcast a notification, and any object that is listening for that notification, such as Object B, can react to it. This way, you can change Object A or Object B without having to update any other object. One of the design principles of object-oriented programming is to encapsulate your program into modular objects that can be updated independently. This makes it easier to maintain and extend your app in the future.

When I was first learning how to program iOS apps, I was copying code snippets, so I wasn’t giving any thought to how my objects were communicating. But at some point, it began to bug me that I wasn’t applying any criteria and being internally consistent, so I started to read up on direct messaging, notifications, and key-value observing (a third technique) until I felt like I could go back through my code and revisit all of my previous design decisions (or, more accurately, non-decisions). But once I started working with Core Data and the intricate iCloudstore initialization process, I realized that I didn’t understand object messaging as well as I thought. When Object A posted a notification, when did Object B react to it? And if Object B and Object C were both listening for the same notification, which reacted first?

I had now drilled below the basic API documentation provided by Apple, so I started doing my own testing, and I discovered that notifications behave like direct messages. When Object A posts a notification in the middle of a method, the method stops executing until Object B finishes reacting to it and returns control. I have read that direct messaging, notifications, and key-value observing all run on top of the same messaging infrastructure in the Objective-C runtime, so, in hindsight, it doesn’t surprise me. It wouldn’t surprise me either if all notifications get compiled as direct messages. When Apple provides different ways for objects to communicate in Objective-C, that’s to give programmers a few mental models to chose from, but the compiler strips all of that out. This made me realize that the object-orientedness of a program only exists at the surface for the programmer.

I never did figure out how the compiler decides which object runs first if two objects are both listening for the same notification. I know how events pass from object to object through the DOM in JavaScript, but I realized that, if the order in which objects react to a notification matters, than a notification is almost certainly the wrong mental model to be using. I also realized that I had a very naive understanding of object-oriented programming. I had resisted the idea of creating a single object to coordinate the iCloudstore initialization process because it seemed to run counter to object-oriented principles. But when taking an object-oriented approach, it is very important to think about the level at which we are encapsulating a program. If I have a bunch of objects that are communicating in an intricate way and I’m having trouble tracing through those communications to see what happens, then it might be logical to encapsulate those objects at a higher level.

When I set out to learn how to program iOS apps, I needed resources and an approach that felt relevant to me. I wanted to create the apps that I wanted as soon as possible. In order to get better at programming iOS apps, I pushed myself to drill down and build up. Actually, that is not quite accurate. When learning anything, I naturally drill down and build up. That’s how I learn. I have to stop myself from drilling down and building up if I am learning something to use once and I don’t need a deeper understanding of it. My drive to drill down and build up has developed over the years as I’ve gotten good at it and I’ve discovered how effective it can be. It is something that I value. I’m sure that my friend Daniel would have drilled down immediately to understand how object messaging works in the Objective-C runtime (something that I still haven’t done yet but would like to in the future) because he thinks that way. Others would have stopped drilling down or building up long before they reached the point that I did. Some of that may be based on intrinsic interest level, but I remain convinced, based on my own personal experience and my experience as an educator, that learning vertically generates a virtuous cycle that leads to more vertical learning, and eventually puts us on a path to becoming our truest self.

Tuesday, January 6, 2015

Building on Uncommon Denominators

[This blog post is part of a series, Defining Vertical Learning.]

The core idea of vertical learning is that we should learn by building up and drilling down. Now, I taught math and science, and math and science are inherently vertical subjects. Concepts build on top of one another. In math, you can drill down and ground everything in axioms; in science, we are still drilling down in search of a Grand Unified Theory. But learning isn’t vertical because of how a subject is organized or taught, it is vertical because of how the learner constructs his or her own understanding of it.

If you have ever spent time in a classroom where students are learning about fractions, you may have heard a recurring question: “Do we need to find common denominators for this?” The question is so common that we typically take it for granted. If students have been multiplying or dividing fractions for a few days without finding common denominators, of course they may temporarily forget whether or not they need common denominators when adding or subtracting fractions. This confusion is natural, right?

But if you ask those same students to combine 3 dimes + 2 quarters, they would never say that the answer is 5 dimes or 5 quarters. They would recognize that dimes and quarters have different values, and they would say that you either have 5 coins or 80 cents. They intuitively know that, in order to add 3 dimes and 2 quarters, you need to convert dimes and quarters to a common unit. There would be zero confusion. In the same way, if you asked students to combine 3 cups + 2 pints or 3 inches + 2 centimeters, they may not be able to convert those units to a common unit and get an answer, but they would know that you can’t just add 3 + 2 and get 5. If you tried, they would jump all over you for making a silly mistake.

But wait a second! Those students have been manipulating and using money for years. They just learned about fractions a few months ago. Of course they have more intuition about dimes and quarters than sixths and eighths. Well, try giving those students a problem involving bushels and pecks. Or tell them they crash-landed on an alien planet and make up some units. Again, they know that they can’t just add quantities with unlike units together without doing some sort of conversion first. They just know it.


The students who can’t remember if they need to find a common denominator when adding fractions almost certainly know that sixths and eighths are different units. Unfortunately, instead of building on top of their existing understandings of working with units, they have built their understanding of fractions off to the side and in isolation. The teacher may have “made the connection” between units and unit fractions for them, but that’s irrelevant. The only thing that matters is how well the learner has constructed his or her understanding of fractions vertically, grounding that understanding in a foundation that is both intuitive and functional. The teacher’s primary role is to probe the learner’s understanding and create experiences that enable and encourage the learner to test and revise his or her own mental model.

What’s worse is that the same thing probably happened earlier. Why do we line up digits to add multidigit numbers? So that we can add ones to ones and tens to tens. Can we add tens to hundreds? Sure, if we do some regrouping (converting). And the same thing will probably happen again when we start simplifying expressions: 3x + 2y + 6x. Which of those terms can we combine again? All of these skills and concepts should be built on top of the same foundation, strengthening the foundation in the process and enabling us to build higher and wider. But how often do you think that happens? And what are the consequences if learning happens horizontally instead of vertically?

When probed, I expect a student’s understanding when adding fractions to look something like this:


Combine 5 sixths and 3 eighths. Hmm… sixths and eighths are different units. I’ll have to convert them into a common unit.


If I cut all of the sixths into four equal pieces and all of the eighths into three equal pieces, I’ll have twenty-fourths. I can combine 20 twenty-fourths and 9 twenty-fourths. It’ll add up to more than a whole, but I’ve got lots of experience working with mixed numbers.


Wait… your teacher didn’t “make the connection” between mixed numbers and multidigit numbers for you? You do know that a multidigit number is a mixed number, right?

Grrr!

Monday, January 5, 2015

Chemistry from the Ground Up

[This blog post is part of a series, Defining Vertical Learning.]

When I first founded Vertical Learning Labs, I wrote a chemistry textbook called Chemistry from the Ground Up, and released it online and as an interactive multitouch textbook for the iPad. I really wrote this textbook for myself and had no intention of publishing it. I basically asked myself: “What would a vertical middle school chemistry curriculum look like?”


The textbook starts by laying the foundation for the particle theory of matter:

  1. All matter is made up of particles.
  2. Those particles are in perpetual motion.
  3. Some of the particles are attracted to one another.

Building on this foundation, the reader is then able to construct an intuitive and functional understanding of the states of matter and the processes of evaporation and condensation. In the construction phase, the reader is deepening existing concepts while building new ones on top of them. In the diagram above, this is reflected by the transition from yellow to green to blue blocks. Notice that when the concept of solubility is introduced, it is already blue. That is because solubility builds directly on top of the same foundation that the reader developed and strengthened earlier in the study of states of matter and phase transitions.

Later, the reader drills down to discover what causes particles to be attracted to one another. By drilling down, the reader gains a deeper understanding of atoms and molecules. This deeper understanding enables the reader to recognize when and why certain properties are characteristic properties of a pure substance, and to build new understandings about cell chemistry on top of the existing foundation instead of off to the side in isolation.

For the reader, the particle theory of matter represents the ground truth. The ground truth must be intuitive enough so that everything built on top of it just makes sense, and it must be functional enough so that the reader can reason through problems with it. Building on top of the ground truth strengthens and reinforces it. Drilling down and deepening the ground truth enables you to build higher and wider above it. I think that it is worth noting that two components of my ground truth, molecular attraction and dynamic equilibrium are barely mentioned in the standard middle school science curriculum.

Consider the conservation of matter. In Chemistry from the Ground Up, this is the first concept introduced, and it is introduced abstractly and in isolation. But later, as the reader applies the particle theory of matter and visualizes the motion of particles, particles are never created nor destroyed. This is reinforced when particles move among the gas, liquid, and solid states, and reinforced again as systems of particles proceed toward dynamic equilibrium. The conservation of matter becomes integral to the reader’s understanding of matter, and the reader applies it intuitively to solve increasingly complex problems. By the time the reader is balancing equations of chemical reactions by counting and conserving the number of atoms on both sides, it has developed into a powerful analytical tool.

If learning has been vertical, then the reader should have no trouble extending this foundation to understanding the carbon, nitrogen, and oxygen cycles. In fact, it should be blindingly obvious at this point that there is a fixed number of carbon atoms on Earth, and that these carbon atoms are “stored” in various molecules that are constantly undergoing physical and chemical changes. So imagine the shock when the reader learns that, 400,000 years after the Big Bang, the universe is made up of hydrogen and helium atoms, and that virtually no carbon, nitrogen, or oxygen atoms exist at all. This cognitive dissonance should lead to the reader to drill down to nuclear reactions and nucleosynthesis, supplanting the conservation of matter with the conservation of mass-energy.

Beyond enabling us to construct a more intuitive and functional understanding of chemistry, building up and drilling down in one domain also fosters the development of skills and habits of mind that encourage us to build up and drill down in all domains. This includes an ability and willingness to actively test and revise mental models.